|
Manipulating the image

There is more to photography than just ‘record’
shots. These shots are those you take of your wife at the beach with her
sister and your brother-in-law. You know what I mean, and you have taken
lots of them in your lifetime. Photographically, we call these ‘record’
shots as all they are doing is recording an event. No ‘art’ or even
artistic input by the photographer required. “Hold it, one, two, three,”
and you’ve got that record shot. Not something to blow up and use as
wall art.
However, injecting some ‘art’ into your photography
is not all that difficult, and the results may just surprise you. The
answer here is ‘filters’ and you do not have to buy one of the expensive
kits either.
The first thing to do is to standardize all your
lenses. Using stepping rings which you can purchase in good camera
shops, you bring all the lenses to the same diameter at the front of the
lens. This way, one filter can be used on all your lenses.
Filters can be used with any camera, film, digital,
compact or SLR, but digital will certainly give you an instant result. I
also believe in not spending too much on filters, and when I say cheap,
the first one costs 1 baht (and is recoverable) and gives you a
center-spot soft focus filter. Using this filter this just means the
center is in focus and the edges are nicely soft and blurred. This
effect is used by portrait and wedding photographers all over the world
to produce that wonderful “romantic” photograph.
You will need a clear piece of glass or plastic
(Perspex) around 7.5 cm square. Put the 1 baht coin in the center of the
Perspex and then gently wave hairspray over the lot. Let it dry and
gently flick the coin off and you have your first special effects filter
- the center spot soft focus.
Now set your camera lens on the largest aperture
you can (around f5.6 or f4 is fine). Focus on your subject, keeping the
face in the center of the screen. Bring up your magic FX filter and
place it over the lens and what do you see? The face is in focus and the
edges are all blurred! Take a few shots, especially ones with the light
behind your subject. Try altering the f stop as well, as this changes
the apparent size of the clear spot in the middle. Simple, cheap and
easy art.
Here is another, the Super Sunset Filter. This one
will give you that wonderfully warm “tropical sunset” which will make
people envious that they aren’t over here to enjoy such spectacular
endings to the day. To produce the warm glow, just take off your
sunglasses and place one side over the lens. It’s that simple! Just look
at the difference yourself, with and without the sunnies. The camera
will see it the same way.
Soft romantic effects can be produced super
inexpensively as well. The first is to gently breathe on the end of the
lens just before you take the shot. Your warm breath will impart a
“mist” to produce a wonderfully misty portrait, or that early morning
mist look for landscapes. Remember that the “misting” only lasts a few
seconds, so make sure you have the camera pre-focussed and ready to
shoot. If you have control over the aperture, try around f4 as well.
Here’s another. Use a piece of stocking (pantyhose)
material. Stretch it over the lens and tie it on with a rubber band. Cut
a small hole in the middle and go ahead and shoot romantic portraits.
There are also other ways of bending, refracting or
just generally fooling the camera’s lens system. You can even use
semi-transparent material like shower screen glass. The concept is just
to produce a “different” effect, one that the camera will pick up. It is
very difficult to predict the outcomes in these situations, but you can
be pleasantly amazed at some of the results. The main idea is to give it
a try!
|

|
Photography for Retirees
Getting older has some down sides, I think everyone would agree, but to make
the twilight years more fun is most important. That is what keeps you young.
After all, look at Grandma Moses, who in her 70’s took up painting and
became a world celebrity. You can do the same with photography, and you
don’t have to wash out the brushes afterwards!
Photography is actually an excellent pastime for
the senior members of your family. They have the time to indulge
themselves, they have endless grandchildren to photograph growing up,
and it gives them something to keep themselves active. A most important
part of growing old(er).
Photography is something that can be picked up and
put down at will, it is not too physically demanding, and modern cameras
can assist in some areas where age has taken some toll. And the end
result is something that can give them great joy, be that award winning
sunsets or just pictures of the grandchildren.
So what camera should Granny get? The first
pre-requisite is autofocus (AF). There are many reasons for this, but
since sharp focus is necessary for a good final print, why not let the
camera do it for you, when sharpness in vision is something that becomes
very problematical as you get older. Since most people need reading
glasses by the time they are 45, and at least half the population has
mild cataracts by the time they are 60, AF is the way to go! Provided
you can point the camera in the right direction, the camera will do the
rest.
Another problem often associated with aging is
stiffening of the fingers. This can make it difficult to operate the
small buttons on some of the very small pocket compacts and phone
cameras. Before settling on any particular camera, you should make sure
that the senior in your household can operate the equipment.
Now I have never been a great advocate of zoom
lenses, but they do have their place, and especially with senior
photography. Zoom lenses save you having to go the distance. Is it just
too much of a hassle these days to walk up to distant objects to get
close-up details? Then a zoom lens will do it for you. With a zoom lens
it is no problem at all to get a close-up, a wide angle and a distant
shot from the same camera position. Maybe an autofocus digital compact
camera with an inbuilt zoom lens is just the camera for you. Just push a
button to make the zoom bring the subject closer or farther away.
As we get older, we are also more prone to the
shakes. Today’s digital cameras can even compensate for the tremor, with
anti-shake technology. I do recommend that you look for this feature
when making your choice. This feature, often called Optical Image
Stabilization makes photography for seniors even easier.
Today’s camera manufacturers have taken the tears
out of flash too. Almost all new cameras have their own in-built flash
which comes on when the light levels are too low, will set their own
flash power and give you perfectly lit indoor night shots every time.
You can even use the in-built flash during the day to give your photos
just a little extra sparkle.
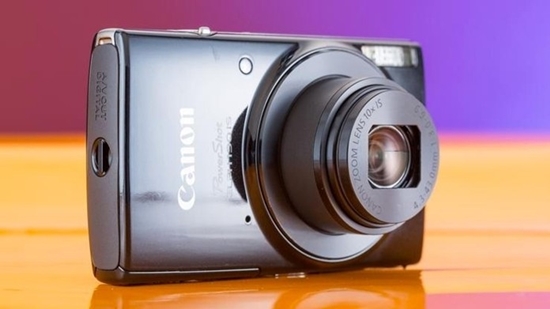
So which camera should you choose? Look for
suitable AF digital compacts with built in zoom, anti-shake technology
and auto flash and a large LCD panel so you can review the images. I
would look at a camera from the major manufacturers, both photographic
and electronic. We purchased a Samsung the other day, compact with 12 MP
and all the rest of the electronic features we look for today.
Avoid the overly expensive ones. The main features
you are looking for are as above, but the most important is whether it
feels good in your hands. The choice is yours.
So there you have it, Grey Power. There are cameras
available now which can get you into photography! If you once had the
‘photographic eye,’ then that ability is still there. Enjoy!
|
|
Digital difficulties

Too
early!
When shooting action, panning gives the best
results. Now many of you will have cameras with an “Action” or “Sports”
mode that you can select at the flick of a switch. Despite what the
camera manufacturer would have you believe, professional action sports
photographers don’t use it! It does not give you “action” shots.
The reason for this is simply that the selection of
the “Action” mode puts the camera on to a fast shutter speed to “freeze”
the action. That gives you a very static shot of your moving subject - a
shot which does not imply movement or action at all. A shot of a dog
running can end up looking as if Rover was frozen to the spot with its
legs in a strange position.
Contrary to that which you would imagine, the
technique to show speed and action is not a super fast 1/1000th of a
second shutter speed or even faster with some of today’s super SLR’s -
but rather something around 1/15th to 1/30th. Now that really is
surprising, isn’t it? However, for this to work, the technique to handle
this slow shutter speed is called “panning.”

Got it
right this time!
The objective with panning is to be able to “stop”
the moving subject, but leave the background a blurred smear. This is
carried out by moving the camera in time with the moving subject, so
that the subject is in the center of the frame at all times, while the
background “moves” behind the subject. Moving the camera to keep the
subject in the center means that the slow shutter speed is “fast” enough
to stop the subject’s action, but too “slow” to stop the effect of the
movement of the camera on the background.
This, by the way, is not an easy technique and will
require that thing called “practice”, especially for those with digital
cameras. Begin by picking on an easy subject, like motorcycles going
past you down the road. Start by selecting 1/30th of a second for the
exposure and practice turning your body as the subject moves past you.
You have to synchronize your movement with that of the moving subject,
and when you press the shutter you must continue to move at the same
speed especially when the viewfinder goes black as the shutter fires and
you cannot see the subject for a brief instant - the most important
brief instant.
When you have become good at this technique at
1/30th of a second, it is time to then try 1/15th of a second. At the
slower shutter speed, the background will become even more of a streaky
blur, giving an even greater impression of speed and action.
With SLR film cameras, where you could use the
WYSIWYG feature (What You See Is What You Get) and see directly in the
viewfinder what the final image would be, panning was difficult, but not
impossible. With the new digital age of ‘easier’ photography, it turns
out that panning is actually slightly harder. The reason is that the
electronic image you see is not quite “real time”, but there is a split
second difference, and in that split second you can lose a moving image.
Take a look at this week’s photos of a classic car
doing around 100 kilometers per hour. In the first shot, the shutter was
tripped too early, so we have lost the back half of the subject. In the
second shot, the photographer managed to get the car central as he moved
the camera in time with the car.
To sum up, to show action and movement, select a
slow shutter speed and stand side on to the action. Turn your body as
the subject goes past, keeping the subject in the center of the
viewfinder. When the subject is directly opposite your position pop the
shutter, while still continuing to turn your body in time with the
subject. With luck, you’ve got it!
|
|
Circles of Confusion - or Confusing Circles?

Circles
of confusion.
There
is a photographic term called the Circle of Confusion, which is really
just an optical one - but still confusing.
With Circles of Confusion you must first understand
that light is reflected off any subject in all directions. Your camera
gathers all the light rays from each point on the subject which are
reflected toward the camera and fall within the circle created by the
opening of the diaphragm. Think of this as a cone of light which has its
apex at the point of reflectance on the subject and its circular base in
the diaphragm opening.
In turn, this cone of light is focused on the
digital sensor “film” plane in the camera. If the lens is doing its job
correctly, then each point reflected from the subject becomes a sharp
point in the camera.

Circles
at the Buddhist ceremony.
Now this is where it all gets a little tricky. If,
for example, the lens cannot keep the exact focus point on the sensor
“film” plane, some areas will have the points recorded as circles, and
these can be known as Circles of Confusion. This is also known as
‘spherical aberration’ and cheap lenses will show this far more than
expensive lenses which have many lenses as a combination, with lenses
selected that counteract aberrations in each element. In this situation,
the circles should also all be of the same size. These are also known as
‘Blur circles’.
This is also tied up in ‘sharpness’ or ‘softness’,
as if there are many (very small) circles this appears in the final
photograph as an in-focus print.
Adding to this confusing situation is the fact that
the diameter of the circles relates to the diameter of the aperture. A
small aperture, like say f22 produces small circles, so the
photograph appears “sharper”, while a large aperture, such as f4,
produces larger circles and so the photograph is ‘softer’. This is why
small apertures should be selected when looking for ultimate sharpness
in a photo. This would also mean that the circles should be of the same
size, as they are related to the aperture.

More
circles.
Now I have included two illustrations of circles in
these photographs, which may, or may not be circles of confusion. They
were taken with a Samsung compact with 12 MP and the event was a
religious ceremony in Isaan. Note that the circles vary in size, and
some are overlying the physical subjects.
According to the Buddhist belief, many spirits were
called to the event and believers are happy to ascribe the circles to a
visitation by spirits not visible to the naked eye.
Similar shots, taken at night with the same camera,
but at a different location do not show the circles.
So what have we got here? Blur circles? Circles of
confusion? The spirit world encircling us? I am interested in your
response.
|
|
How did we end up with 35 mm?

Even though few people still use film, the most common denominator has been
35 mm, and despite the fact that the world has gone digital, the reference
is still to use 35 mm as the yardstick. The focal length of your digital
camera lens may be expressed as being “equivalent to 35 mm” for example.
With many film stock sizes previously available (35
mm, 120, 5x4 and 10x8) it may come as a surprise that still
photographers were not the first to use 35 mm.
The answer to why the 35 mm size became the most
favored lies in two areas. The first was the availability of film. Did
you know that the first people to use the 35 mm film with perforated
edges were not still photographers, but were the original movie makers?
In the late 1890’s this film was introduced to be used in the burgeoning
movie market - so there was good availability of film stock of this
format and that was 120 years ago.
In fact, 35mm film is even now the basic film
format most commonly used for motion pictures, and remains relatively
unchanged since its introduction in 1889 by Thomas Edison. The origin
for the 35 mm size was simply taking the Eastman Kodak 70 mm roll film
for photography, being cut in two. William Kennedy Laurie Dickson,
working for Edison, then cut four round perforations per frame along
both edges. This format was initially called ‘Edison’ size. The
flattened perforations were introduced by Bell & Howell around 1900,
which remain to this day for camera original film. Kodak-Standard
perforations were introduced some ten years later for projection use.
However, the first still cameras to utilize this
film did not come out till 1913 and there were quite a few brands on
offer between 1913 and 1924, but none really ‘caught on’.
The milestone in photographic history was the 35 mm
camera produced by the German Leica company that came out in 1925. This
had actually been based on a 1913 design when the prototype was built by
Oskar Barnack. Leica refined this and produced an immediate winner with
the following specifications - a focal plane shutter with speeds from
1/25th to 1/500th of a second along with a ‘fast’ f 3.5 lens. The small
size, precision and build quality of these cameras made them instantly
popular, and began the reputation for highest quality that Leica still
enjoys today.
In 1930, Leica improved on the original and coupled
rangefinders, even faster shutter speeds and interchangeable lenses came on
the scene.
The next company to join this new breed of cameras was
Zeiss Ikon who produced the Contax in 1932, which by 1934 had a coupled
rangefinder, a separate optical viewfinder and a range of slow shutter
speeds as well.
In the earliest days, the photographer had to wind 35mm
film into reusable cartridges himself, and cut the film leader. In 1934,
Kodak introduced the 135 single use cartridge as we know it today. It was
the invention of Nagel Camerawerk in Stuttgart, and Kodak was so
interested in this invention that it bought the entire company, and
marketed the Nagel camera as the Kodak Retina. Board room take-overs
were just as frequent then, as they are today.
As this ‘new’ 35 mm format became more popular, the
next milestone was the introduction of color slide film. Kodak began
producing the Kodachrome film in 1935 for 16 mm movie work. This was the
first multiple layer color film and in 1936 this was expanded into the
35 mm format. In fact, the early boxes of Kodachrome used to have
printed on them “For use in Retina, Contax and Leica cameras.”
The next major step was the introduction in 1942 of
the Kodacolor process to produce color prints and the future of 35 mm
photography was sealed.
After this, when the Japanese avalanche started, the
end result was almost a 35 mm film camera in every home in the western
world. That avalanche only slowed when the digital technology became cheap
enough (and good enough) to take over the camera market. However, we should
not forget Oskar Barnack and the early movie makers!
|
|
Snaps or art?

There is nothing wrong with taking snapshots.
Firing away with your DSLR or point and shooter is something like
Russian roulette. You might get lucky, or on the other hand …
What I hope to do this week is to show you just how you
can move from snaps to actually produce “art” and an artistic portrait is
the goal. With shots of people, we are looking at the difference between
pictures and real portraits. The two styles of resulting photographs are
poles apart. ‘Portraits’ comes from the word ‘portray’ and means to make a
likeness of. Portraiture is even described as the ‘art’ of making that
likeness, and that is where the difference comes.
We have all got, or have seen, passport photographs.
These are the archetypal picture. They show what your face looks like.
Nothing more, nothing less. However, when you have a portrait taken, the
photograph should do more than just show what your face looks like, but also
give some inkling as to what you are like. Sort of ‘value-added’ if you
will. I describe it as making a likeness of the ‘person’. Somehow you have
to get the personality into the picture, and that way you have a real
portrait.
It is for this reason alone that you cannot walk into a
photo studio and get your portrait taken. At best you will get an
adequately lit picture of yourself. You will not get a portrait. For the
photographer to understand the sitter takes time in getting to know the
sitter. Likes and dislikes, hobbies, anxieties, a wife or mother - a whole
thumbnail sketch of the person, and then and only then, should the sitter
get in front of the camera.
So let’s make you, the weekend photographer into a
portrait photographer. To portray the person, you first need to know how
the sitters perceive themselves. People who consider themselves to be
happy, spontaneous people should be photographed laughing, head back, open
mouthed, smiling, tossing the hair around - you get the concept, I’m sure.
More studious people should be shown in that manner. A book as a prop is a
great idea to convey the mood and make the sitter feel relaxed. Having
already found out a little of the sitter’s likes and dislikes, you can also
add some props, and have the subject begin to relate to them, like the book
in the studious portrait. This also helps them to relax.
I have mentioned before in this column that the first
rule with all sitters is to get your subject to relax. If your favorite
lady is standing rigidly to attention, I can guarantee that the end result
will not be pleasing to either the sitter or the photographer. When
photographing Thai people in particular, it is even more important to get
them relaxed and happy, as they do tend to “stand to attention” with arms
held straight at their sides, looking as if they are on army parade.
The pose to avoid at all costs is the subject straight
on to the camera. This is unfortunately the commonest pose - but it is the
most un-glamorous pose as far as women are concerned. That is why it is
used in passports! Here’s what to do to get over this problem. Start by
sitting your lady in a chair, and then turn it 45 degrees away from the
straight ahead position. Now ask her to slowly turn her head and look at
the end of your camera’s lens. Look through your viewfinder - see? It
looks better already. Now ask her to gently raise the shoulder closest to
the camera and smile. Guess what? You are starting to get a portrait
image.
That basic pose can be modified by turning to the left
as well as to the right, shoulders up or down, open mouthed smile or shy
grin. Each shot will have a different look. Try to get the subject relaxed
by talking to them, cracking jokes or anything that will get them to relax.
From there you try to get the personality of the sitter to come through.
Try your hand at portrait photography this weekend.
|
|
Preventive camera maintenance
There is one school of thought that suggests that
cameras are now so foolproof that they last forever and no maintenance
or servicing is necessary. I also know that when something costs very
little, we tend to ignore it. When we are looking at 50-baht items, they
are easily replaced with loose change.
The same does not go for cameras. Today’s cameras,
even in the consumer range, are no longer cheap. It is difficult to find
any half-decent DSLR camera under 20,000 baht and even the better point
and shooters are around 10,000 baht. Photography and money are
inexorably intertwined. To show you the money that can be involved in
photography, my favorite lens was a 40 mm Hasselblad wide angle, with a
huge bit of glass on the front, that would cost in Thailand over 200,000
baht. Worth looking after?
The first concept is to understand just what it is
that will go towards destroying your camera. Usually these are simply,
dust and grit, moisture and condensation, battery contents and being
dropped. Looking after your investment is then a simple case of
countering the above factors.
Moisture and condensation are the easiest ones to
counter, but the dampness comes from more than just being caught out in
the rain. Thailand is a hot and humid environment. How many times have
you taken your camera outside and found you could not see through the
viewfinder because it had steamed up? That is condensation. The best
answer here is to keep small sachets of silica gel in your camera bag.
Many bottles of tablets come with perfect little sachets in the top of
them.
There will also be times when you get caught in the
rain, or you may even want to get rain shots. The camera body is
reasonably water proof, but you should carefully wipe the outside of the
case dry afterwards, and especially blow air around the lens barrel and
the lens mount.
Dust and grit are the ever-present danger in the
environment. How many times have you got a small piece of grit in your
eye? Often, I will wager. Small particles such as that can be very bad
for the lens focusing and zooming mechanics too. This is where a blower
brush is needed. They are cheap, but do a great job. Get one. Never
brush bits away with your fingers - your sweat is corrosive!
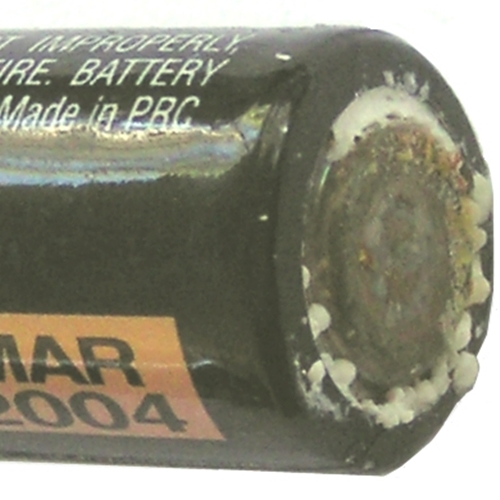
That leads us to the even more serious type of
corrosion - leakage from batteries. Just about every camera in the world
these days has a battery, even if it is just to drive the needle on the
light meter. Working with an external battery pack on a Nikon I have
found everything has failed - a sure sign of battery failure. Inspection
showed this to be true, and the cheaper batteries leaked the most.
This little scenario would have been much worse, if
the battery had been internal. The discharging batteries give off fumes
that attack and corrode the complex electronic circuitry. That little
problem can destroy the camera totally - expensive! There is a moral
here, isn’t there?
In fact, there are two morals to be learned. The
first is to check batteries every three months in this climate, I would
suggest, rather than just waiting for the batteries to fail or become
erratic. And secondly, you get what you pay for - so buy the best you
can. It will serve you well in the end. Acid leakage (and even acid
fumes) from a battery can totally ruin a modern camera, getting into the
electronics so that it never works properly again. The answer here is to
discard the batteries every twelve months, even if they seem to be fine,
and if you are not going to be using the camera for an extended period,
then take the batteries out altogether.
Finally, keep your camera in a soft case that can
absorb some shocks. Not the silly leather or plastic thing it came in.
If you have not got one - then go out and buy one today. They are very
inexpensive, especially when compared to the cost of the camera.
Preventive maintenance.
|
|
10 Digital Tips for SLR’s

I was asked to put together a small “instruction” sheet for
new DSLR users, and so here it is. While the compact point and shooter is a
great way to get into photography (or even the smart phone), there are
limitations with the basic cameras, especially if you wish to improve above
the “Auto” mode type of photography.
1. Begin with the Rule of Thirds.
In this, you position the main subject one third in from either side of
the frame and one third up from the bottom, or down from the top.
Putting the main subject slap-bang in the middle produces a very boring
photograph. Look at commercial photographs and you will see the rule of
thirds everywhere.
2. Digital cameras have become very
smart at counteracting camera shake, but there is a limit. Holding the
camera in one hand while waving one, two, three fingers at the subject
is a recipe for “soft” fuzzy photos. Hold the camera in two hands. One
hand around the body and one around the lens and hold the camera close
to your body for support, not at arm’s length. Look through the
viewfinder, rather than at the LED screen. If you are shooting with a
slow shutter speed, use a tripod or monopod whenever possible, or use a
tree or a wall to stabilize the camera.
3. Most digitals have an in-built
light meter, but if not, the Sunny 16 rule will help you. In bright
sunshine, choose an aperture of f/16 and 1/100th of
a second at ISO 100. You will end up with a sharp image that is neither
under or over exposed.
4. Use a Polarizing filter. This
filter helps reduce reflections from water as well as metal and glass;
it improves the colors of the sky and foliage, and it will protect your
lens too. Get a circular polarizer because these do not confuse the
automatic metering.
5. Learn to control ‘depth’. When
photographing landscapes it really helps to create a sense of depth. Use
a wide-angle lens for a panoramic view and a small aperture of f/16 or
smaller to keep the foreground and background sharp. Placing an object
or person in the foreground helps give a sense of scale and emphasizes
the depth of field to infinity. You may need a tripod as a small
aperture usually requires a slower shutter speed.
6. Note the background and keep it
simple. If possible, choose a plain background – neutral colors and
simple patterns. This is vital in a shot where the subject is placed off
center.
7. Avoid flash indoors. Flash can
look harsh and unnatural like a rabbit in the headlights. To avoid using
flash, push the ISO up – usually ISO 800 to 1600 will make a big
difference for the shutter speed you can choose. Use the widest aperture
possible – this way more light will reach the sensor and you will have a
nice blurred background.
8. Become familiar with ISO
ratings. The ISO setting determines how sensitive your camera is to
light and also how fine the details of your image. When it is dark push
the ISO up to a higher number, say anything from 400 – 3200 as this will
make the camera more sensitive to light and then you can avoid blurring.
On sunny days choose ISO 100 as there is more light to work with.
9. Pan to show motion. Choose a
shutter speed around two steps slower than usual, so 1/30th is a good
average. Lock the focus and follow the action and shoot. This gives a
sharp subject and a blurred background. You will need to practice this
many times.
10. Experiment with shutter speed.
Don’t be afraid to play with the shutter speed to create some
interesting effects. When taking a night time shot, use a tripod and try
shooting with the shutter speed set at 4 seconds. You will see that the
movement of the object is captured along with some light trails. If you
choose a faster shutter speed of say 1/250th of a second, the trails
will not be as long or bright; instead you will freeze the action.
|
|
Ansel Adams – lest we forget!
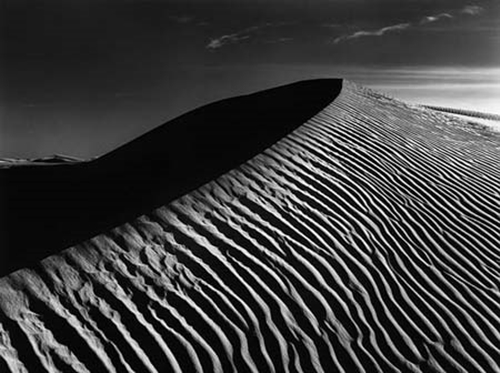
The famous American photographer Ansel Adams has been dead for 24 years, but
his influence on photography as an “art form” will probably be with us
forever. Particularly Black and White, which is rapidly reaching “art”
status all the time.
Adams was born in San Francisco in 1902, but his early
interest was in music and the piano, which he initially hoped to develop
into a professional career. However, as a 14 year old in 1916 he took his
first photographs of the Yosemite Valley, an experience of such intensity
that later reviewers of the Ansel Adams history recorded that he was to view
it as a lifelong inspiration.
The Yosemite Valley would probably not be as well known
world-wide as it is, if it were not for Adams, who returned every year
thereafter to record its grandeur. During these trips he became even more in
love with nature and its conservation and became associated with the Sierra
Club in 1920.
In 1927 he published his first portfolio, ‘Parmelian
Prints of the High Sierras’, and the following year he became an official
photographer for the Sierra Club.
Like all photographers, Adams was interested in the
work of others and was influenced by the straight photography of Paul
Strand, and the works of Steiglitz, Edward Weston and Imogen Cunningham.
It was with the latter two photographers that he formed the Group f 64.
For Adams and Weston especially, the f 64 philosophy embodied an
approach to perfect realization of photographic vision through
technically flawless prints. Even the use of the name f 64 shows the
depth of field concept seen in so many of Adam’s photographs – sharp
from front to back. Although the concept of the Zone System had not been
finally formulated, you could see the beginnings of this at that time in
the early 1930’s.
In 1935, Adams first book on photographic technique was
published and by then he was giving one-man exhibitions in America. Moving
to the Yosemite Valley, he continued to photograph the natural wonders and
many of his images were published in the 1938 publication of Sierra Nevada –
The John Muir Trail.
With the advent of WWII, Adams went to work for the
Department of the Interior in Washington, D.C. During this time he began
to develop a codification of his approach to exposure, processing, and
printing – this became the Zone System. In effect, this system aimed at
pre-visualization of the final print. In other words, you, the
photographer know the result you want, and by application of the Zone
System, you can make it happen (though this is not necessarily easy).
Adams said conventional photographic recording, was
“acceptable though perhaps uninspired” and created the phrase “acute and
creatively expressive.” In the Zone System, he engineered a technique by
which the photographer could manipulate the photograph’s internal tones.
By means of filtration, development, and print controls, contrast could
be heightened or softened and the placement of object values along the
tonal scale could be predetermined by the photographer before the
shutter was released. Yes, he used a notebook to record the details he
would later print out so faithfully in his dark-room.
After the war, Adams moved into lecturing as well
as continuing to photograph. He also developed a knowledge of the
techniques of photographic reproduction to assure that the quality of
any reproduced work might approach, as closely as possible, the standard
of the original print.
His place in the photographic halls of fame were by
then assured, following his award of a Guggenheim Fellowship in 1948 to
photograph national park locations and monuments. More books on
photography were written, and his stature continued to increase within
the Fine Arts circles. By 1966 he had been elected a Fellow of the
American Academy of Arts and Sciences, and by the late 1970’s his prints
were being sold to collectors for prices never equaled by any living
American photographer.
We should all aspire to perfection and I give you
three Ansel Adams quotes:
“You don’t take a photograph, you make it.”
“A good photograph is knowing where to stand.”
“The single most important component of a camera is the
twelve inches behind it.”
|
|
Take amazing photographs – Really? Yes you can
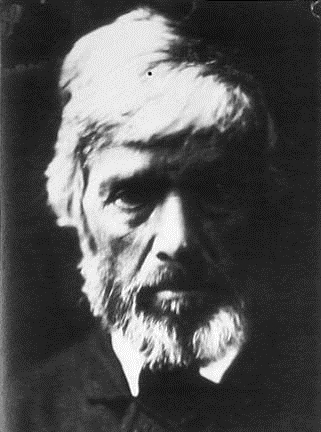
Thomas Carlyle was taken by Julia Margaret
Cameron in 1867.
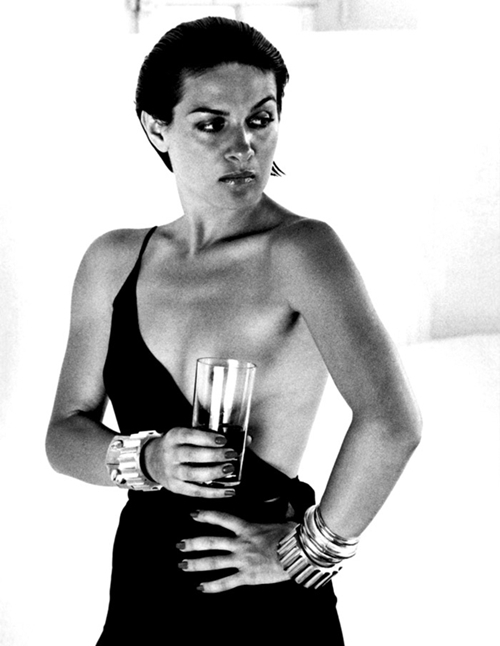
Paloma Picasso taken by Helmut Newton.
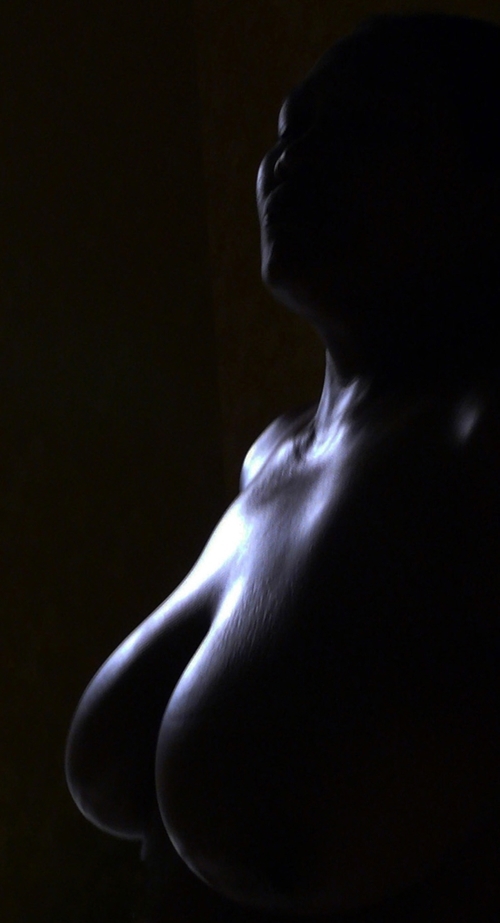
The
lighting was a tungsten garden light and off to one side to give the stark
B&W we were looking for.
When photography was in its infancy the Kodak company
pioneered, “You push the button – we do the rest.” And so photography
flourished.
Today, the wheel has gone full
circle and your DSLR awaits your finger on its button. You push that
button and the camera does the rest!
Photography has changed so much in
the past 20 years. Part of that change is cameras. Cameras have changed
so much that images are now “instant”. Digital programs have made
photography a simple process.
However, amazing images do not rely
upon digital electrotrickery, amazing images come from you, the
photographer. And here are a few ideas.
Photography in its infancy was
Black and White (usually just called B&W). The final image in B&W can be
definitely a stark and powerful image.
To get that amazing B&W photo, you
need contrast, which means you have to learn how to control light. After
all, photography means painting with light.
Begin by turning off the flash
in-built into your camera. Why? Because the on- camera flash is
difficult to control, and too powerful.
Look at the photos with this issue.
All were taken indoors with only one source of light. Nothing fancy.
Your first shot should be taken in
portrait format and the next landscape. I would get in the habit of
doing this, because you will get some images which are not the ones you
had in your mind, but can be quite amazing.
Do not take one shot on its own, or
you will miss the one shot you are hoping to produce. In the studio
setting we worked on getting six good shots from of a roll of 36.
To show that powerful portraits are
made and not by chance, Pic 1 of Thomas Carlyle was taken by Julia
Margaret Cameron in 1867 and was one of around 12 of these portraits
taken at the sitting.
For Pic 2 the lighting was a
tungsten garden light and off to one side to give the stark B&W we were
looking for. The background was black velvet (a subject covered
recently) and the model was positioned close to the camera and was set
to try different poses until we got the look we wanted. The button was
pushed around 10 times with the model trying the different poses. Some
worked, some didn’t
Pic 3 was one of Paloma Picasso and
was taken by Helmut Newton. Stark B&W with one breast exposed, but when
you look, it is not visible behind the wine glass. A typical thought
producing Helmut Newton image.
Now it is your turn. Using natural
lighting try to photograph anything having made the lighting stark and
full of contrast. Of course, you can also get the B&W image by
manipulating with Photo Shop, but you do need the ‘contrasty’ image to
begin with.
|
|
Enjoying f15 stops

Shutter speeds are an inherent part of photography and the
simplest f stop uses the setting 1/15th shutter speed. Almost every camera
ever made has a setting called “15” which stands for 1/15th of
a second. This is also probably the most underused shutter speed ever, and
yet it can help make your photographs very much better.
There seems to be an idea in the
photographic world beyond Infinity that anything slower than 1/60th of
a second cannot be hand-held, and you must use a tripod. This is tripe -
unless you have some medical condition resulting in uncontrolled shaking
spasms. Modern DSLR’s have ‘anti-shake’ built in to the electronics.
Don’t ask me how they do it, just believe.
The reason to use 1/15th is
to expand the light range in which you can take shots without flash,
such as sunsets for example, or to bring out the background, even when
using flash. You know the shots taken at a function where you get
someone looking like a startled rabbit in blackness, where if you had
used a 1/15th shutter
speed you would have got a nice mellow background to soften the picture.
Of course there are a few tricks to
hand-holding at the slower shutter speeds. The first is to steady
yourself and that can be done easily by leaning against a wall or a pole
(preferably not a chrome one attached to a go-go dancer). The second is
to hold the camera firmly in both hands, take a breath in and hold it
and then gently depress the shutter button. I have even shot at ½ a
second by holding the camera firmly pressed down on the back of a chair.
Take a few as some will have obvious camera shake, but you will get at
least one good one.
Still on the number 15. There is a
theoretical f stop which could be called f 15. F stops
after all are only a way of measuring the diameter of the aperture
inside the lens, to bring it to its simplest terms. As you go through
the usual f stops of f 8 to f 11 to f 16,
you are actually cutting the light down by one half each time. The f
stop scale is also an inverse ratio, as the bigger the number, the
smaller the diameter. There is a good mathematical reason for this, but
just believe me again.
If you really want to get
technical, for example, f/16 means that the aperture diameter is
equal to the focal length of the lens divided by sixteen; that is, if
the camera has an 80 mm lens, all the light that reaches the film passes
through a virtual disk known as the ‘entrance pupil’ that is 5 mm (80
mm/16) in diameter. The location of this virtual disk inside the lens
depends on the optical design. It may simply be the opening of the
aperture stop, or may be a magnified image of the aperture stop, formed
by elements within the lens.
The f stop scale is a
sliding one, allowing for fractional differences in the light allowed
through to the film (or the digital sensors). Most old cameras had an
aperture scale graduated in full stops but the aperture was continuously
variable allowing the photographer to select any intermediate aperture,
and thus it would be possible to shoot at f 15.
The continuously variable aperture
cameras slowly disappeared, with ‘click-stopped’ aperture became a
common feature in the 1960s; the aperture scale was usually marked in
full stops, but many lenses had a click between two marks, allowing a
gradation of one half of a stop.
On modern cameras, especially when
aperture is set on the camera body, f-number is often divided
more finely than steps of one stop or half a stop. Steps of one-third
stop (1/3 EV) are the most common, since this matches the ISO system of
film speeds. Enough technical details! Time to just believe me again.
|
|
Black Velvet
With the current ‘lock down’ situation, this is an ideal opportunity to
experiment with some different photographic projects. This is really special
effects photography and for the amateur photographer can be done indoors
To assist all budding photographers, would you
believe me when I say that you can get a very valuable piece of
photographic equipment at the local Indian tailors? Probably not, but
you really can buy something there which is of inestimable value for
special effects in photography.
Indian tailors fit into low budget special effects
photography, and when I say “low budget”, that is exactly what I mean.
In my personal library I have books that claim to do just that and then
go on about the “low budget” equipment required – an enlarger,
registration table with registration pins, copy stand and photo floods
and studio strobes. Hardly what I would call low budget! However, it is
possible to produce many special effects photos without having to
purchase expensive equipment. The first item you need is a roll of black
velvet.
Black velvet is one of the easiest ways to
introduce some very different effects into your photographs. The secrets
behind the use of this material include the facts that it is
non-reflective, it does not affect exposure values when taking the shot
and shadows do not register on it.
Because it does not affect the final image, this
makes black velvet the ideal material to use as a background when you
wish to combine images, or do other special effects using Photoshop or
whatever is your favorite graphics package.
Here are just a few ideas you can do with black
velvet. Simple double exposure in the camera becomes very easy with this
material in the background. Set your camera in the double exposure mode
(or if you have not got one, select “B” for time exposure). Position the
subject to one side of the picture and pop the flash to take the shot.
Now reposition the subject on the other side of the picture and shoot
again. You will have two perfect shots on a perfectly black background.
(For those using the “B” setting you have to have the room dark and the
camera on a tripod. Cover the lens between taking the shots to stop
extraneous light coming into the camera too, but it is possible to get
excellent double exposures in this way.)
Another use for black velvet is in making pictures
of light trails. These can be very spectacular special effects pictures
and are very easy to make. Stick the black velvet on the ceiling and
suspend a torch from the center. With the camera facing upwards, twirl
the torch and record its movement for ten seconds or so. You have just
made a totally original image!
Photo montage is another simple effect you can
produce, using the black velvet as the background. Here you let your
creative self run riot. You can produce any picture you want, whether it
be yourself standing on top of the Statue of Liberty or three elephants
standing on a beach ball – you are in total control!
With this type of special effect you have to cut
out the elements you want from other pictures, be they prints or
magazine photos or whatever. Cut carefully and then run a black felt-tip
pen around the edges (See why? It will sit on black velvet!) and you are
ready to combine all your subjects.
Put your composition (photo montage) together and
positioning your camera above the montage, look carefully through the
viewfinder. This is how the shot will look, remember (WYSIWYG).
Reposition any items at this stage. Next important item is to keep the
camera back parallel with your background as this will keep all the
elements in focus. Now shoot! Three exposures half a stop apart.
If you find the direct flash gives you a reflection
problem, you can use household “floodlights”, one each side at 45
degrees to the surface. You will get a “warm” color cast, but since you
are producing “surreal” photographs, it does not really matter. Have fun
this weekend, after you’ve been to the tailors!
|
|
Still lives are not dead lives

I randomly picked a book from my shelves this week. It was
35 years old, and every item was still applicable today. The main thrust was
that still life is the only style of photography where the photographer has
total control over the final image. A good still life is the result of
application of many photographic principles and good composition. A poor
still life is the fault of no one but the photographer.
The camera used for still life
photography ranges all the way from 35 mm DSLR’s through to 5x4 view
cameras. Lighting also ranges from electronic flash, tungsten and window
lights. Since most of these are too bright, producing dark shadows, the
still life photographer will also need diffusing equipment, with umbrella
reflectors de rigeur for flash heads and homemade soft boxes quite
easy to make and very suitable for tungsten light sources. Buy a 1 meter
square sheet of white foam core as well.
There’s still more, with seamless
background paper high on the list, and a good sturdy tripod is mandatory,
and a locking type cable release will make life easier for you.
If you are starting off trying still
life I would not begin with buying all the bits and pieces that go with
still lives, but keep it simple till you get more used to the discipline.
Let’s begin with window lights and a tripod and your DSLR, with the Manual
mode selected. Also disable the on-camera flash. For a subject, let’s use a
fruit bowl with some vegetables.
At this stage you must come up with the
composition you might think suitable. This is also the stage where you
select the “hero”. With a bowl of fruit and some garden vegetables, this can
be difficult, but for the exercise let’s select the tomatoes. Recognizable
and colorful and for a still life, the tomatoes must be perfect. No bruises
or cuts or marks. Having done that, carefully polish them so they are
looking very delectable.
Now start to arrange all the items in
the photo with the bowl of fruit central and the tomatoes at the
intersection of thirds and partly in front of the bowl. Look through the
viewfinder to get the composition. What you see with the naked eye, is not
necessarily what the camera sees, with differing apertures producing
different views. It is a case of WYSIWYG (What You See Is What You Get), and
that is what you see through the camera.
Having decided on the composition, you
must now decide on the lighting. Again, your lighting should identify the
“hero”. I generally work with two lights and a reflector. One is to light up
the backdrop, which then splits the subject matter away from the background.
Now bring one light in from the front, but off to one side. This produces
shadow as well as illumination, and shadow in still lives is crucially
important. Without shadow, your tomatoes are flat, with no 3D effect at all.
Now comes the third item, the
reflector. White foam board works well and you reflect a little light back
into the scene, to control the amount of shadow. Do not be afraid of shadow!
You need it. When you use the reflector, look at the difference depending
upon whether your reflector is close to the subject or further away. As I
mentioned at the start of this article, the photographer has total control.
Now look through the viewfinder again
and double check all the variables of composition and lighting. If something
is not right, correct it. Don’t be lazy and think, it’ll be OK in the end.
It won’t.
With today’s SLRs it is so easy for you
to take the shot and get an instant review, but remember that looking at the
small LED screen does not show the entire picture. But it does allow you to
try different items in the quest for the award winner.
|
|
Pro photographer demands danger money

Nobody would ever put photography in
the list of dangerous pastimes, but let me tell you, I have had some dangers
to overcome to get the image the client wanted. I have been called upon to
do some dangerous photography. No, not in a tiger’s den, but an aerial shot
taken from a helicopter. This flying device had been modified for aerial
photography by removing both doors, making it an even more unsafe and
uncomfortable mode of transport than they usually are.
The brief was to photograph a
particular building site from around 200 meters up, and the direction had to
be from the north. It was a windy day and when we got to the shoot, the
helicopter pilot was unable to hover in a position where either of the door
apertures would give me the shot from the north. Since the hire of
helicopters is not cheap, and we only had one hour to get the shot, there
was only one answer - climb out on the landing struts and hang over the
edge!
Since I get vertigo standing on a
chair, this was not going to be easy. Fortunately the helicopter was set up
with a harness for me to wear, with a rope leading back inside the cabin.
You should try stepping out into space at 200 meters up, no parachute, and a
piece of ‘string’ attaching you to a helicopter. It was not a case of just
standing on the landing struts, but I had to lean out, with the harness
taking the strain as I moved even further out (like a crew member on a
yacht). The buffeting from the rotors and the cold day all added to the
problems I was having with camera shake (compounded by fear).
Eventually I managed to get the shot I
needed, using hand signals to the pilot to indicate more or less height.
Then I had to get back in. Since I was already well past the point of no
return, I had to get the assistant to pull me in. But the assistant was a
woman and not strong enough. Fortunately the pilot saw what was the problem
went on auto-pilot and dragged me in. I have not done a helicopter shoot
since that day.
However, much more dangerous was the
following shoot, done in my studio. The brief was an advertising shot for a
bottle of vodka. The final shot was to be the bottle sitting beside a dish
of strawberries. Now while that sounds simple, it is not all that easy.
The first item I had to get was the
strawberries. Since the client will complain if any strawberry is even
slightly less than perfect, this means you buy a huge amount of strawberries
and spend the next hour picking only the best ones. After that you paint
them with vegetable oil so they look all shiny and juicy. That was the easy
bit.
Now to make a bowl of strawberries, and
the bottle of vodka ‘jump off’ the page, you have to light them from
underneath. So I used a sheet of glass supported at each end, about one
meter from the floor, pulled some meters of black paper from the background
paper on a roll hanging from the back wall of the studio, cut two holes in
it where the bowl and the bottle would sit and we were starting to look
good.
While getting flash heads ready and the
5x4 plate camera focused, I had the lights under the glass going. After
several minutes of fiddling and fussing I was ready to pull the first
Polaroid. While peering at the ground glass focusing screen I suddenly heard
this loud cracking noise. I looked up, just in time to be hit on the head by
the roll of black background paper!
What had happened was the lights had
heated the glass too much and it had broken. As it fell in two pieces, it
dragged the black background paper down too, and the roll came off the hooks
on the back wall, neatly landing on my head.
And you thought still life photography
wasn’t dangerous?
Holiday encounters
Don’t get your hopes
up. This is not some seedy expose of past holiday romances. This is an
article on how to get better photographic results from your holiday.
In all the flurry of activity when
packing for the overseas trip, it is easy to forget to pack a camera (or two
if you are a real enthusiast). However, everyone wants a photographic record
of the trip, the event, the new experiences. After all, you saved for 11
months for this, don’t let it just become a casual conversation on your
return!
Now before you add “Pack Camera” to the
To Do list, there’s a little bit of photographic preparation to be done too.
The first, and should be most obvious, is just to make sure the camera
works. If you haven’t used the camera for some time, buy new batteries for
it and check the memory card before you go away. There’s nothing worse than
finding out that the camera had a problem after you get back! You should
take a few shots and look at them critically to make sure it is really
working properly.
Now, no matter where you go these days,
someone has been there before you. And they’ve written a guide book about it
too, so your next move is to actually plan some shots before you even leave
home. Research your destination properly and you should know what is likely
to be a significant place, monument, castle, lake, waterfall, etc., in the
area you will be visiting. When you read the Lonely Planet Guide or
whatever, use a highlighter pen to remind you of photo opportunities.
Thinking about and anticipating “how”
you should take any landmark will produce much better results when you
finally arrive to take the picture. You will not be so over-awed that you
just stand there and go “click”. You will be ready to try to show this
segment of your trip with some photographic flair. It works, believe me!
It is always tempting to take
photographs from the plane. There is one classic shot you should always
attempt on every trip. That is the aerial. Shooting out of plane windows is
not really all that difficult with today’s cameras, but there are a couple
of catches. Firstly, pick a porthole where you can see a little of the
engine intake in the shot. Adds drama and shows how you got up there! Shoot
from the side of the plane opposite from the sun. This way you won’t see the
scratches on the plane window. Use a wide-angle lens if you’ve got one, set
the camera on auto and get as close to the window as possible, but not
touching it (otherwise you get vibrations coming through to give you fuzzy
photos).
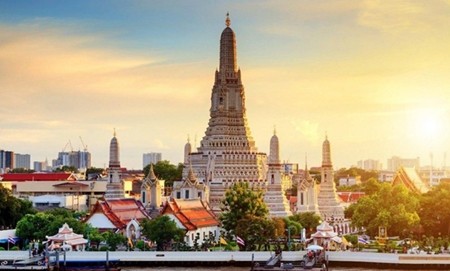
Shooting the locals. Your research of
the places you are going to will soon tell you if there are interesting
“locals” which would make good photographs (such as this one pictured here).
Priests, tribes folk, indigenous people, policemen in uniform and the like
all make for good shots and gives the “atmosphere” of your holiday. It’s OK
to shoot when they are unaware of your presence, but if you want a formal
photograph, always ask. Just wave the camera and smile if you can’t speak
the local lingo. It usually works. If not, wave money! That always does.
If you are going to well-known
destination like London, Paris, New York, then you will always be able to
buy another memory card over there, but if you are going to the Mongolian
Steppes, you may need to bring your own supplies. I also suggest that the
digital folk take along more than one spare memory card and download their
precious images back here, where you know that everything (should) work
correctly and not delete images unexpectedly.
Finally, you should think about how you
are going to present the results. It is always a huge temptation to bring
out folders of photos as soon as you get back. Wait! Sort them, keep the
good, throw away the bad. Show only your best shots and everyone will be
amazed at your superb photographs!
Digital photography shutter speed control
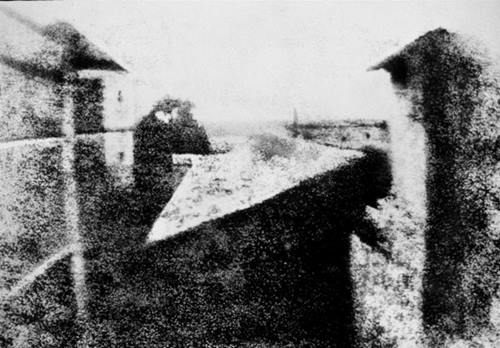
Photo by Joseph Nicéphore Niépce.
A new generation of photographers is
upon us old “film” folk. However, there seems to be a very common notion
that ‘somehow’ digital photography is totally different from the old
fashioned film photography. I do not know how this happened, but let me
assure you that digital cameras and film cameras do exactly the same job. It
is only where the light falls and how it is stored and recorded that is
different.
First, a few basics. All photography,
since the French inventor Joseph Nicéphore Niépce first invented it in 1826,
has worked on the principle of allowing the light carrying the image to go
through a lens and then fall on to a sensitized surface. Originally this was
a glass plate coated with silver compounds which got darker when exposed to
light. The degree of darkness depended upon how much light came through the
lens, and for what length of time. This is the principle covering aperture
(or lens opening), and shutter speed (in other words, how long the aperture
is left open).
That principle still holds good today.
Originally, the aperture was literally as large as you could get, and the
time was measured in hours. This was because the sensitized material was
really not too sensitive at all, but we improved with the silver plates.
The first improvement came in the lens
design. These could let more light through in a shorter period of time, and
the aperture only needed to be left open for a few minutes, rather than
hours.
The next major development was the
sensitized film, which could record an image in fractions of a second.
Photography as we went into the 1900s was very similar to the technology
today. You could capture an image at an aperture size of f 11 open
for 1/60th of a second, on the film of the day, which was rated at around
100 ASA (sensitivity rating of the film).
During the next 100 years, lenses got
better and gave less distortion, film became more sensitive and gave
clearer, sharper images, and the mechanical shutter speeds approached
1/4000th of a second. This was enough to stop a speeding railway train,
without the aid of Superman!
And then came what people have recently
considered to be the “digital revolution”. A completely new way of
photography, requiring special new cameras which could show you the image
you had just taken, immediately! No more agonizing waits at the film
processing shop. Instant gratification for the “gimme, gimme, me now”
generation.
However, this is where the misnomer
occurred. It was not a “revolution” it was merely an “evolution”. The
principles of photography (sometimes called ‘painting with light’ by the
romantics) were just the same. And the application of them was just the
same. A lens let in the light, for a proscribed length of time, and this was
recorded by light sensitive electronic “film”. The difference was that you
did not have to develop this new electronic “film” in chemicals. It could be
viewed immediately by using electronic processing. Really, there was no
difference.
Now, just as the old film cameras had
aperture and shutter speed controls that were adjustable by the
photographer, guess what? The new digital cameras have apertures and shutter
speeds that are adjustable by the photographer as well. And in the same way,
you can get creative results from your digital camera, exactly the same as
you could with your film camera.
This is where some differences occur,
however. With the ‘old fashioned’ film cameras you rotate a dial on the lens
barrel to open or close the diameter of the aperture, and you had a dial on
the top of the camera that you rotated to give you shutter speeds from
usually 1 second through to 1/1000th of a second. The two factors could be
operated independently, and this was called Fully Manual Mode. However, they
could also be operated in conjunction with each other, called Aperture
Priority if the aperture was set first, or Shutter Priority, if the shutter
speed was set first.
Try setting fast shutter speeds in
Shutter Priority mode this weekend and stop the action.
|
|
You want to be a war zone photographer?
One of the extreme forms of
photojournalism is war zone photography, and one of the extreme exponents of
war photography was a Hungarian Andre Friedmann.
Friedmann’s war zone photos are not
well known, in fact his name has gone into obscurity, but the work of an
American war zone photographer Robert Capa is very well remembered. The
interesting part here is that Friedmann and Capa are one and the same
people.
As a fearless war zone photographer,
Robert Capa has had his pictures held up as shining examples of fearless
photojournalism, while poor old Friedmann has really been forgotten.
Getting to the truth behind this
strange fact brings in a third person, Gerda Pohorylles. Gerda, also known
as Gerda Taro, was Andre Friedmann’s agent in his early days in Europe. It
was Gerda who decided that the market for his pictures would be much larger
if the Europeans thought he was a famous American photographer, and so
Robert Capa who went to Europe was created by her.
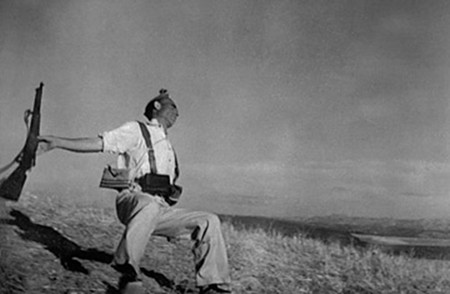
Amongst the famous images from Europe
are his shots of the Spanish Civil war, including the photograph of a
Spanish militiaman literally at the split second of impact, with death
recorded for posterity. The decisive moment as Henri Cartier Bresson would
call it. The un-named soldier was not the only one to perish in the Spanish
conflict as poor Gerda, who was also a photojournalist, met her end
reporting that conflict.
Hungarian Friedmann, as Robert Capa,
did eventually emigrate to America and was to accompany the American forces
back to Europe in 1944. His photographs of the D-Day invasion are now
legendary.
War heroes are immensely popular
figures in America and the photographer Robert Capa was the friend of many
film stars, writers and other celebrities such as John Steinbeck and Gary
Cooper.
He covered five wars in all. The
Spanish Civil war, the Chinese-Japanese war, WW II in Europe, the Israeli
war of Independence and the French Indo-China war.
Capa was never one to send back
photographs from well behind the lines. He shot from close to the action.
His photographic rule was, “If your pictures aren’t good enough, you’re not
close enough.”
Whilst that saw him getting
award-winning photographs, eventually this need to get close to the action
finally killed him, when he stood on a landmine in May in Vietnam. It is
said that his body was found still clutching his camera and the film inside
was unharmed, but I could not verify this. However, he was a war
photographer to the very end.
As well as his 70,000 photographs, Capa
left the world a photographic legacy in the form of the Magnum Agency. This
huge photo bank was created by Capa, in conjunction with the aforementioned
famous French photographer Henri Cartier-Bresson. Magnum today still
represents the more excellent photographers around. Capa will not be
forgotten like Friedmann’s, old negatives in photographic archives.
Of course, getting close to the subject
is still one of the primary rules of picture taking. “Step several meters
closer” is one of my ways of saying the same thing. When you look through
the viewfinder at the subject, do just that – with the camera to your eye
walk towards the subject and see just how the emphasis changes in the
picture. The closer you get, the more the subject will fill the frame and
dominate the entire photograph. In fact, this weekend take one shot from
where you would normally take it, then take another couple as you walk
closer. Compare the end results and see if Robert Capa (Andre Friedmann and
Harry Flashman) are not correct.
With Pattaya being a tourist resort
city, every day you will see holidaymakers recording their trip of a
lifetime, from about 20 meters away. This includes shots of the hotel and
their friends out front. The end result will be disappointing with tiny
little people in front of the building.
If they would only walk several meters
closer it would be so different. Some days I think I should mark the spots
for the photographers to stand and the subjects to be placed, in the front
of our major hotels.
|
|
Your new camera

Box Brownie.
I have never properly embraced the
social media. I really don’t care what you ate for breakfast and I’m not
into hugs all round. And as for “Amen”, I find it insulting at best and
silly at worst.
However, there is one area where it is
very difficult to beat what the social media provide – and that is instant
access to people’s opinions.
I use the analogy of buying a car. Many
years ago I was in the market for a second hand Mazda RX7. These were the
days BFB (Before Face Book) and I was looking for a way to canvas opinions
by the owners of such vehicles. Every time I saw one parked at the side of
the road, with less than 30 minutes on the meter, I would wait and when the
owner arrived I would ask him whether it was a good car or otherwise. The
vast majority were very happy with their RX7, so I bought one and became
very happy with mine too.
So what has that got to do with your
choice of camera? A lot. Now you can go online asking for opinions on the
latest DSLR and within 24 hours you will have your answer, or what the
majority thinks. This is more truthful than the sales spiel from the camera
shop counter jumper.
However, before you even get to that
stage you should be looking at what type of camera you should be buying for
your type of photography.
I read a most interesting piece of
research which came from the Sony people. According to the Sony survey, 72
percent of DSLR buyers use their cameras to “capture family memories and for
fun.” A Box Brownie will do that.
Also, the greatest spur to buying a
camera at a specific time is an imminent trip. These people are not going to
do a crash course in serious photography before they take off, so the
requirement of competent, fully automatic mode is reasonable. And wanting to
get the best possible images is understandable. Then there is weight. Who
wants to lug a conspicuous brick around Venice when a small compact system
camera will do the job?
The compact camera section of the
marketplace is certainly the most volatile. As Sony found, only 28 percent
of camera buyers are going to go for the all-singing, all-dancing DSLR
cameras.
One of the problems when comparing
cameras with cameras is people tend to read the magic number called
megapixels and conclude that it is the deciding parameter between brilliant,
good and not so good. 24 megapixels is better than 12 which in turn better
is than 4.
Whilst the above is partly true, it
really does depend upon what you want to do with the end result. Are you
going to be blowing it up to the size of a barn door, or will it be a 4R
(6x4) at most? If you have been hired to produce photographs for billboards,
then look at a camera with megapixels coming out its strap swivels.
Otherwise, anything from six to 10 MP is more than adequate.
So what should you be looking for when
buying a camera these (electronic) days? To start with, a fast autofocus.
Instant zip-zip, not “pause for a second while I get myself ready and then
zip”.
I also recommend inbuilt image
stabilization. So many photographs are spoiled by camera movement producing
‘soft’ images that can be overcome with image stabilization electronics. And
as a further small advantage, these types of systems are particularly good
for the senior citizen photographer.
You should also look at the shutter
speeds the camera is capable of. 1/2000th of a second should stop a railway
train (in Thailand, not in Japan) and be sufficient for 99 percent of action
photography. It is also advantageous if any proposed camera has a time
exposure setting so you can take photographs at night, including fireworks.
Sony’s advice is right: if you are not
serious about getting to grips with the functions of a DSLR then don’t buy
one. On the other hand, if you are deadly serious about your photography,
don’t buy anything else. And see what other photographers think.
|
|
f8 and be there
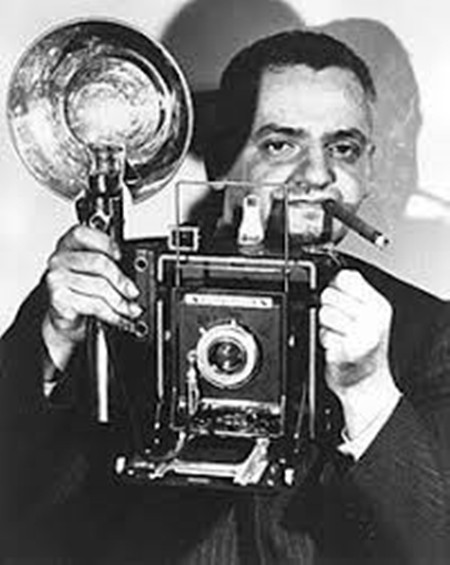
Arthur H. Fellig, aka ‘Weegee’.
Photojournalists can have a problem
with morality and ethics. The following test shows just how much stress
there can be for these photographers.
The situation: You are in Pattaya.
There is chaos all around you caused by the tropical storm with severe
flooding. You are a photojournalist working for the Pattaya Mail newspaper
and you are standing on Beach Road, photographing the flooding.
Suddenly, you see a man in the water.
He is fighting for his life, trying not to be taken down with the debris.
You suddenly realize who it is... it is a well known violent criminal on the
run. You notice that the raging waters are about to take him under.
You have two options:
(1)You can save the life of this man –
or -
(2) You can shoot a dramatic Pulitzer
Prize winning photo, documenting the death of one of the country’s most
despised, evil and powerful men!
Now the question, and give an honest
answer (nobody can see you)!
Would you select color, or just go with
the classic simplicity of black and white?
So now, to be sensible after that
little chuckle, the job of a photojournalist is to get back to the editor
with a usable photograph of some event, be that a fire, flood, the Jester’s
Children’s fair or the TFI frizz and flares night. (These require the
photographer’s presence and a camera that works.)
The photojournalist’s creed of “f8 and
be there” may have come from Arthur H. Fellig, also known as ‘Weegee’. Born
in Poland in 1899, he went to America in 1909. He worked for a few studios
and then got a job in the darkroom at Acme Newspapers. Life in the newspaper
business is always exciting and frantic. Arthur H. Fellig reveled in that
excitement. He had found his niche. He was only 21 years old but he decided
he was going to be a freelance news photographer.
He soon became known as the first on
the scene of any newsworthy happening, be that fire, murder, suicide or
landslide. He was so uncannily aware of what was happening that people began
to feel he had some kind of psychic powers of prediction. At that time,
America was also in the middle of a Ouija Board fad and from this Fellig was
to adopt his nickname “Weegee”.
Of course, Weegee was not psychic, but
just used to sleep fully clothed, with a police radio on his pillow. In the
boot of his car was his “office”, complete with typewriter to knock out the
words, spare film and lots of flash bulbs. Weegee would arrive, record the
shot, type the words and have everything on the editor’s desk within the
hour. It was no wonder that Weegee was so popular with the news media of the
day.
By 1935, Life magazine was doing
features on Weegee and his work. There was no doubt about the fact that he
had the photographic “eye”, but for Weegee, the subject was the all
important part of the photograph. And the subject he dealt with was done
incredibly directly. Weegee was not one to be horrified by the sights before
him, such as gangland killings. He took the shot that kept that horror for
the eyes of the newspaper readers the next day. (Interestingly, that direct,
confrontational photographic style is still used in the Thai language papers
today – check any front pages for graphic images.) Another quote from this
amazing man, “I like to get different shots and don’t like to make the same
shots the other dopes do.” When asked what his formula was he replied, “I
just laugh. I have no formula, I’m just myself, take me or leave me. I don’t
put on an act. I don’t try to make a good or bad impression. I’m just Weegee.”
Weegee is remembered for his record of
the seamier side of New York life. This was put into book form, called the
Naked City and was published after WWII. Unfortunately, the wide public
recognition that came from this book ended the directly grotesque nature of
his images and Weegee went to Hollywood where tinsel-town swallowed him up.
He died in 1969.
|
|
How not to miss great shots
Good shots, and even great shots, can
appear any time. If you are not going to miss the chance of a lifetime, the
first tip is to make sure you have a camera with you, or, and I used to
struggle to say it – a high quality smartphone! However, having just
purchased a smarter than me phone, the new ones are very sharp, but they are
not quite as capable as a good DSLR system.
However, when the shot of a lifetime
just happened before your eyes, a shot that could have kept you in champagne
for the next three months, you need to be ready.
Great shots can be shots that just
somehow epitomize life in Thailand, for example are always worth taking (and
may be financially rewarding). It could be a katoey posturing on Beach Road,
or even the one of the buffalo in the paddy field with two birds standing on
its back. Always remember that you are living in a land that your countrymen
save up for 12 months just to get here for a holiday. You (we) are lucky and
should not let photographic opportunities pass us by.
So this week, let’s look at a few
specific examples of “how to” when you are looking to record those “once in
a lifetime” images.
Thailand is a Buddhist country with a
total of 41,205 Buddhist temples (Thai: Wat) since last update. This is
confirmed, of which 33,902 are in current use, according to the Office of
National Buddhism. You will need a wide angle lens to capture the size of
the temples and stairs. Plan the photography for late afternoon when the
shadows grow long and the sun casts a warm atmosphere to your shots. If you
have a close-up lens then look at photographing some of the ornamental
statues. Again you will need the afternoon light.
Pattaya comes alive at night and we
have the odd nocturnal events and places. Lots of lights, neon signs and
flood-lit fountains are the norm for this type of photograph. The secret
here is a Wide angle lens again with an aperture down around f 1.8. This is
the time to set your digital to 800 ASA, or 400 ASA at least. The other
secret is not to use your flash. Now I fully realize that this is
photography after dark, but the whole concept is to let the attractions
provide the illumination, rather than blasting it with your flash burst. If
you try and take neon light using flash you will totally wash out the neon
and again get very disappointing results. If you cannot get enough light to
hand-hold, then use a tripod.
One of the more challenging travel
situations is the summer beach holiday. It is very difficult to photograph
the beach and not end up with a washed out look in the final photographs.
The secret here is a Polarizing filter and the time of day you shoot. This
is where the Polarizer works so well, especially with the glare from the
sand. The Polarizer will also give you a blue sky to contrast the yellow
beach sand. The time of day is also just as important. Shoot early morning
or late afternoon when the sun’s rays are skimming across the beach and the
tracks and ridges in the sand will show up as shadows.
Some of you will be exponents of the
wilderness type holiday, trekking and camping and taking in the vast
grandeur of breathtaking natural wonders. The secret here is a wide angle
lens, look for low viewpoints and set the ASA on 50 or 100, plus a tripod if
you can. The idea here is to use the lens at around f16 or f22 to maximize
the depth of field. This in turn and the slow ASA setting, will require
longer exposures – hence the tripod. Shooting in this way will give you
maximum detail in the shot, maximum content and visual theater. Finally,
shoot early morning or late afternoon as well to get the dramatic shadow
effects and really give the impact to the Grand Canyon! Try using the
look-out at the Naval Radio station.
|
|
|
|